Adding images to your pages
- Once logged in to your weblaunch control panel, locate the page to which you wish to add images
- In the text editor (you can add images to either the main copy or extended copy) click with your mouse to set the cursor to the location you want your image to appear. Bear in mind this may require some experimentation depending on how you want the placement of the image to affect the text.
- Click the insert/edit image icon in the toolbar:

- Click the browse icon:

- For an image to appear on your website you need to copy it to our server. This process is known as 'uploading'. If you have already used the desired image elsewhere on your website it is already on our server and should appear in the list of images in this dialogue box. If so jump to step 8.
If not click the upload button:
- Click the 'choose files' button. Locate the image or images you wish to add to your website and click 'Select'.

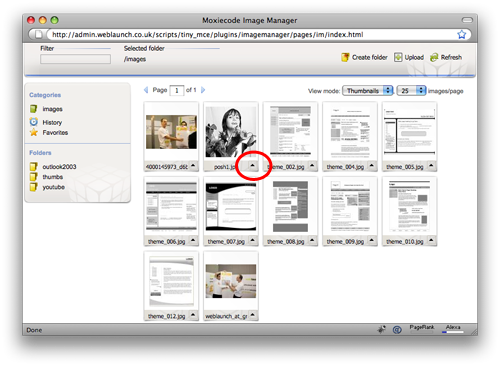
- You will return to the dialogue box which will display a list of the files you have selected. Click 'Upload to server'. The images will be copied to the server, and you will return to the dialogue box listing your images:

- At this point you can choose to edit the image if you want. Click on the arrow at the bottom right corner of the image in question:

- Click on 'edit'. Here you can crop, resize, flip and rotate your image. Click 'Save' when you're done and you'll return to the list of images (as above).
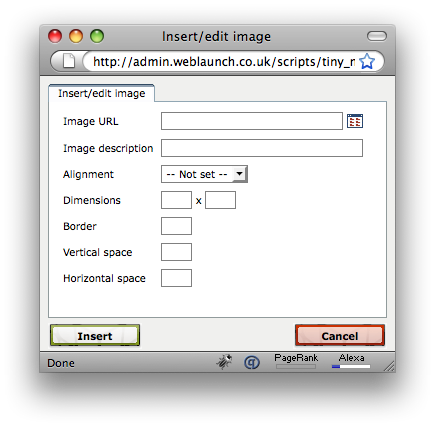
- Click on the image you wish to insert into your page. You will be returned to the image edit dialogue box:

- It's a good idea to enter a description into the 'Image description' field. You can change the alignment of the image using the 'Alignment' drop-down. Leave the dimensions alone, though, some browsers don't do a great job at resizing images. Enter a number into the border box if you want a border around the image - the higher the number, the fatter the border. Same goes for the Vertical and Horizontal space boxes. Try different values to see what works best for you.
- Click insert to add the image to the page.
Latest News
- New schedule of updates and improvements
- 16th September 2023
- OK, so we admit, it's been a while. It's not that there's been nothing going on at Weblaunch HQ,… more...
- Weblaunch GDPR compliance
- 25th May 2018
- We're pleased to announce that Weblaunch is fully GDPR compliant, and most weblaunch customers need… more...
- Testimonial star ratings now built in
- 27th March 2018
- We're pleased to announce another upgrade to our testimonials. We've added testimonial headings… more...
- December's News
- News Archive


